Festive Easter Bunny Cake Recipe
Prep Time:
26 hours
Cook Time:
30 minutes
Servings:
8 slices
Ingredients
- ¾ cup white fondant icing, divided
- pink gel food coloring, divided
- black gel food coloring
- 2 cups butter, room temperature, divided
- 1 cup + 2 tablespoons granulated sugar
- 4 large eggs, room temperature
- 3 teaspoons vanilla extract, divided
- 1 ¾ cups flour, sifted
- 2 teaspoons baking powder
- ¼ teaspoon salt
- green gel food coloring
- blue gel food coloring
- purple gel food coloring
- yellow gel food coloring
- 3 ½ cups powdered sugar
- ¼ cup chocolate mini eggs
Directions
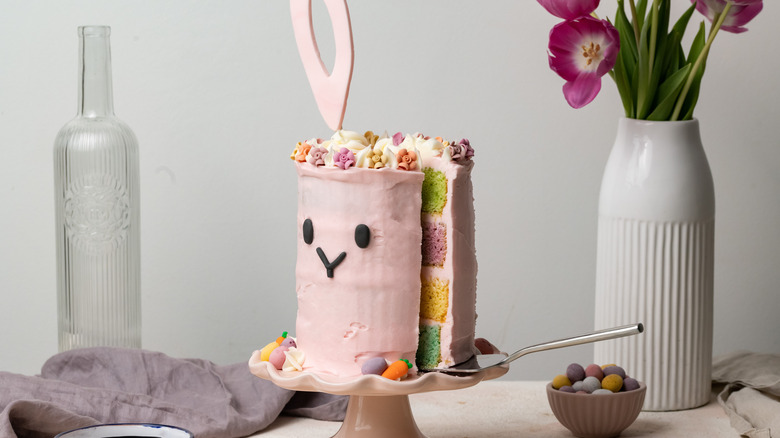
- Start by making a template for the bunny ears. Using baking paper and a pencil, draw bunny ears that are roughly 6 inches tall. You can freehand or find an online template for guidance. Cut the ear template out.
- Remove 1 tablespoon of fondant and set it to the side, then mix a few drops of pink gel food coloring into the rest of the fondant icing until it is a uniform shade of light pink. Roll this out using a rolling pin, and then place the bunny ear template on top. Use a sharp knife to cut out 2 bunny ears.
- Attach a cake pop stick to each bunny ear by dipping it into edible glue (if using) and then placing it 1-2 inches up the back of each ear. Use a pinch of the leftover pink fondant icing to create a seal over the top of each cake pop stick. Alternatively, just use fondant entirely to attach the ears to the cake pop sticks.
- Allow the ears to sit out for 24 hours to dry. Store any leftover pink fondant for future projects.
- To make the bunny nose and eyes, mix the remaining tablespoon of fondant with black gel food coloring until it is a uniform, dark color. Pinch a small amount off to roll into a thin, small sausage shape, roughly 1 ½ inches long. Trim the ends and then bend the thin strip into a V shape. Using a little more edible glue, attach one of the trimmed ends to the bottom of the V to complete the bunny nose. Set this aside to dry.
- Use the remaining black fondant to make the eyes by dividing it into 2 balls and rolling them into similar shaped ovals. Set these aside to dry.
- Preheat the oven to 350 F and grease four 6-inch cake tins.
- In a stand mixer, beat together 1 cup of butter with the granulated sugar until it is pale and creamy.
- Beat in the eggs one at a time, then add 2 teaspoons of vanilla extract and mix again until smooth.
- In a separate bowl, combine the flour with the baking powder and salt, before mixing into the rest of the ingredients to form a thick cake batter.
- Divide the cake batter evenly into 4 separate bowls (about 1 cup of batter into each bowl). Add in a few drops of green, blue, purple, and yellow gel food coloring separately into each bowl. Be careful to only mix the batter until the food coloring is just combined.
- Pour the cake batter into the four prepared cake tins, and then bake them for 30 minutes in the oven, until they are risen and spring back to the touch. Remove the cakes from the oven and set them aside to cool completely.
- To make the buttercream icing, beat the remaining cup of butter in a stand mixer for 2 minutes, until it has paled in color. Then, sieve in the powdered sugar 1 cup at a time and mix until combined. Add the remaining teaspoon of vanilla extract and mix once more. Remove ½ cup of the buttercream icing and set to the side. Add a few drops of pink coloring to the rest of the frosting and mix until it is a light pink color.
- To assemble the cake, trim the domed tops off of each cake using a bread knife or cake leveler. Transfer the pink buttercream to a piping bag with a large round nozzle, then stack up the cakes, piping pink buttercream between each layer.
- To keep the cake steady while icing the outside, you can optionally push a metal or wooden skewer through the top to hold the layers together. Using the piping bag, apply pink buttercream to the outside of the cake, then use a spatula to smooth the buttercream. The frosting doesn't have to be perfectly smooth.
- To finish off, pipe a little of the reserved white buttercream around the edges of the cake, and pipe 2 swirls on top where you will place the bunny ears. Push the cake pop sticks holding the bunny ears into the cake so that they are firmly held, and then add the eyes and nose to the front of the cake to form the bunny face.
- Decorate with a few mini eggs, and some sugar icing flowers and carrots if you choose.